Prepare for your telehealth visit

1. Getting Started with Tebra
Access The Patient Portal Before Your Appointment
-
Check Your Email or Text Messages: After scheduling a telehealth appointment, you will receive reminders with a link to access your telehealth visit room.
-
Device Requirements: You can join the appointment using any mobile device, laptop, or desktop with an internet-connected browser, camera, and microphone.
Creating Your Account
To create your account, please visit the Tebra patient portal link provided in your email and click on “Get Started”.
-
Enter your E-mail
-
Create and confirm a new password.
-
Enter your date of birth.
Logging In
-
Go to Patient Portal Login.
-
Enter your username and password.
Click “Sign In” to access your dashboard.
2. Preparing for Your Appointment
Note: Google Chrome is the preferred browser for optimal use with Telehealth.
Technical Requirements
-
Device: Computer, tablet, or smartphone with a camera and microphone.
-
Internet Connection: Stable high-speed internet.
-
Preferred Browser: Latest version of Google Chrome for optimal performance.
-
Permissions: Ensure your browser has access to your camera and microphone.
Environment Setup
-
Quiet Space: Choose a private area free from distractions.
-
Lighting: Ensure your face is well-lit.
Background: Neutral background to minimize distractions.


3. Accessing Your Telehealth Visit
Open the Telehealth Visit Link sent to you via email or text message:
-
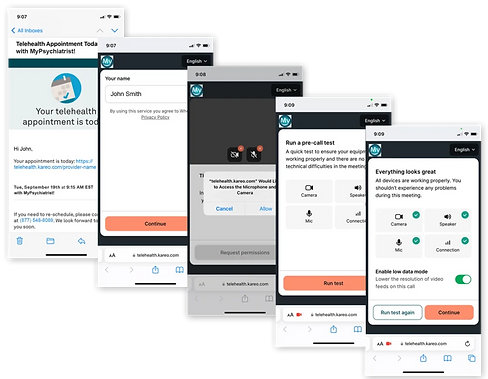
At least 15 minutes before the start of your appointment, click the telehealth URL sent to you via email or text message.
-
This will open the Telehealth Visit page in a new browser window.
Enter Your Name:
-
Type in your full name and click Continue.
Request Permissions:
-
Click Request Permissions to allow access to your camera and microphone.
-
When prompted, click Allow to enable these permissions.
Run the Pre-Call Test:
-
Click Run Test to start a system check.
-
Verify Camera: Ensure you can see yourself. Select the correct camera if you have multiple.
-
Verify Speaker: Confirm you can hear the test audio.
-
Verify Microphone: Record a short audio clip and play it back to ensure your microphone is working.
-
Connection Test: The system will automatically check your network speed.
-
Review the results. Green check marks indicate everything is working. If there are any issues, click Help me fix this for troubleshooting tips.
Join the Visit Room:
-
Click Continue after the pre-call test.
-
Click Knock to notify your provider that you’ve arrived.
You’ll enter a virtual waiting room until your provider lets you in.

4. Virtual Waiting Room Experience
While You Wait:
-
Waiting for Approval: A message will confirm that your provider has been notified.
-
Provider Messages: Your provider may send updates. Please note you cannot reply to these messages.
Ending the Visit:
When the appointment concludes, click Leave to exit the session.

